Thursday, 21 May 2009

Episode 119 - Shrooms - Cheesy Stuffed Mushrooms with Spinach

M-M-M-MUSHROOMS! No, not the bad types which makes you high but the edible ones, full of nutritional values which does not harm your health! Hehe Well, mushrooms are not really part of the vegetable and fruits category. They are basically grouped under Fungi and are so darn healthy that you can like eat as much mushrooms and won't get sick but maybe a little to much would harm your bowel system, if you know what I mean *hehe*.

For myself, mushrooms has a particular distinct taste to it. I usually have a very bad habit of eating them out of the tin can cos i love them but for some, mushrooms are just not very "edible". Bellybites.com mentioned that mushrooms are low in calories, have no cholesterol and are free of fat and sodium! How great is that?
Moreover, Mushrooms are full of essential minerals and contain B-complex vitamins. Some mushrooms can even help prevent diseases and keeps your skin healthy as well as promote good vision. Bellybites.com also mentioned that one portabella mushroom takes care of nearly one-third our daily value; a serving of white or crimini mushrooms supplies one-quarter of what we need daily. Now, isn't that a cool fact?

This is an easy Mushroom recipe stuffed with cream cheese and Spinach.
Cheesy Stuffed Mushrooms with Spinach

Ingredients:
8 medium -large sized mushrooms

Half Container of Philidelphia Cream Cheese (Spreadable)

Half a handful of Spinach leaves ("Bo Chai")

Half a handful of Basil Leaves (dried ones, 1 tablespoon)

Salt & Pepper

A few tablespoon of Olive Oil & Butter

Image from flickr.com

Method:

Cut the Spinach and basil leaves till fine. Mix them with the cheese. Put in salt and pepper to taste. Mix well. Wash the mushrooms thoroughly, add a bit of olive oil in the inner bit (bottom side up) and put a tablespoon of stuffing in each of the mushrooms. You can leave the mushroom stalk or you can cut them off as you like, both ways, it still taste good.

In a baking tray, grease with some Olive oil and butter, place the mushrooms stuffing side up. Drizzle with Olive oil before baking them in the oven, top heat on until you can see the cheese turns light brown. Timing should be around 15 - 20 minutes.

Serve with fresh tomato dip such as the instant Raguletto Tomato pasta Sauces.

Serves: 3-4

Episode 118 - Spaghetti with Leftover Lambshank


I made this ages ago, lucky I took pictures of it. Managed to deco the dish some more hehe. My sister brought back some leftover lambshank meat and it was so much that my family couldn't finish em. So it was nearly dinner time and I was thinking what can I do with the meat so that it wouldn't be so boring eating the same thing again. So I decided that I'd create a pasta dish out of it. Well, this is basically another dish where you just need to have a few ingredients and dump eveything together. It just takes like ten to fifteen minutes to cook! And you can have a delicious meal after... Mmmmmm

Spaghetti with Leftover Lambshank
Ingredients:
Half a packet of San Remo Instant Spaghetti
A bowl of leftover Lambshank meat
A tin of Hunt's Diced Tomatoes flavoured with Basil, Garlic & Oregano
A cup of Raguletto Bolognese Sauce
2 cloves of Garlic
Half Large Onion
A cup of Portobello Mushrooms
4 tablespoons of Olive Oil
1 tablespoon of Butter
Salt & Pepper

Method:
Easy. First, you just need to cook the pasta in salted water as instructed on the packet. If it's instant, it won't take too long so a few minutes after, you can start preparing the sauce. Like the Elbow Pasta recipe, get a non-stick wok and with medium low heat on, sate you chopped garlic and onion and along with the sliced mushrooms. Then, pour in the Sauces and give it a good stir. Now you can dump in the shredded leftover lambshank meat. By now, your spaghetti will be done and just take a tong and grab the spaghetti and place them in the wok. Switch off the heat and stir well. Season with salt and pepper to taste.

Garnish your spaghetti with more Basil leaves and Parsley. Enjoy it with a side of salad leaves. Delish!
Serves: 4

*Tip: If you can't get the particular Hunt's diced tomatoes with Basil, Garlic and Oregano, you can just buy the one without the flavours and add the Basil and Oregano (preferably fresh, if you're using dried ones, put a tablespoon each) when you cook the sauce. For the mushrooms, you can also use the tin canned Button mushrooms but I prefer the fresh ones because they have more taste to it.

So guys, cooking is easy, you just need a bit of idea and improvise what you already have at home!

Till the next post, Cheerios!

Wednesday, 20 May 2009

Episode 117 - Top 10 Kitchen Countertops - Part 2

Sorry guys, I had to split the Kitchen Countertops thingy into 2 as the blog won't post the whole thing like I wanted. Think it has too many words in it. Anyway, here is the Top 5 of the Top 10 Kitchen Countertops. Enjoy reading!

-THE TOP 10 KITCHEN COUNTERTOPS-

Granite is the countertop material of choice when there are no other things to think about - like money. It defines elegance in a kitchen. As the use of granite becomes more widespread, the price comes down. The beauty of the stone contributes to the beauty of even the most modest kitchen.
Pros: holds up to heat; comes in a range of almost 3000 colors; looks permanent and substantial; will last a lifetime; new sealers are almost maintenance-free; 2nd highest hardness rating after diamonds; has a high value to home buyers.
Cons: expensive, but becoming more affordable; requires some maintenance; some stones absorbs stains if not sealed; knives can become dull if you cut on it; can crack if stressed or improperly installed.

2. Engineered Stone
Engineered stone is composed of 93% quartz particles. It is available in a larger range of colors than granite and has a nonporous surface that resists scratches. It's easy to maintain, without the annual sealing required by natural stone. Some brands on the market include DuPont Zodiaq®, LG Viatera®, Cambria Quartz, and Silestone®.
Pros: Resistant to stain and acid; easy care.
Cons: Expensive.

3. Solid Surface
Because solid surface counters are just what they're called, solid, any scratches can be sanded out. The countertops are custom-made to your specifications by companies such as Avonite, Corian, and Swanstone.
Pros: comes in a rainbow of colors and patterns; seamless; stain resistant.
Cons: vulnerable to hot pans and stains which can damage the surface; can be moderately expensive.

4. Ceramic Tile (as seen in pic above)
Ceramic tile is durable and easy to clean. Add to that inexpensive and you've got a really good choice for countertops for the average home. Because it's installed a section at a time, it can be done by most resourceful homeowners.
Pros: takes hot pans; easy to clean; wide range of price, color, texture and design.
Cons: counter surface is uneven; tiles can easily chip or crack; grout lines become stained; custom-designed tiles are very expensive.

5. Laminates
Laminate counters bear trademarks such as Formica, Nevamar, and Wilsonart. They're made of plastic-coated synthetics with a smooth surface that's easy to clean. The pieces are cut to size and finished on the ends.
Pros: you can buy laminates in lots of colors; easy to maintain; durable; inexpensive.
Cons: scratches and chips are almost impossible to repair; seans show; end finishing and front edge choices can be pricey.


Granite Countertop

Laminated Countertop by Formica

To the fan, thanks for the idea.

And guys, please don't capi and tick the reaction for the non-food posts as nyaman or not *haha*
Till the next post, don't stop cookin'!

Episode 116 - Top 10 Kitchen Countertops - Part 1

Scratching your head on choosing which countertop for your kitchen is the best? Well, scratch no more because I've found the TOP TEN KITCHEN COUNTERTOPS! Though my kitchen countertops are made of tiles, my future dream kitchen would have a granite one. A lot of people would choose Granite which is No. 1 on the list.
So I found this at About.com (http://interiordec.about.com/od/kitchencounters/tp/tp_countertops.htm). You can go to the site and search for more info on each type countertop. I tell you this has great info on the countertops because it provides the advantages and disadvantages of each type of countertop so you can choose the best and the most affordable one.
Different people may have different taste or maybe some would choose based on their kitchen design. Some may prefer laminated tops for a Modern feeling or some may prefer Marble as they create an elegant look to their kitchen. Here are the bottom 5 top ten kitchen countertops.

6. Wood or Butcher Block (See above pic)
Wood countertops offer a beautiful warm look and are available in a wide range of colors and finishes. Hardwoods such as maple and oak are most often used as countertop woods.
Pros: easy to clean; smooth; can be sanded and resealed as needed.
Cons: can be damaged by water and stains over time; scratches must be oiled or sealed according to manufacturer's instructions.
For a really contemporary and industrial look for your kitchen, stainless steel is a good choice. They are heat resistant and durable. Because they're constructed to your specifications, you can have a seamless countertop.
Pros: takes hot pans; easy to clean.
Cons: Expensive; noisy; may dent; fabrication is expensive; you can't cut on it.
Soapstone is generally dark gray in color and has a smooth feel. It is often seen in historic homes but is also used in modern homes as both a countertop and sink material.
Pros: rich, deep color; smooth feel; somewhat stain resistant.
Cons: requires regular maintenance with applications of mineral oil; may crack and darken over time.
9. Marble
Because of it's extremely high price tag, marble is not often seen on the countertops of whole kitchens. To get the luxurious look, use it on an island or inset at a baking center. Marble requires constant maintenance, as it easily stains. Some new sealers retard staining.
Pros: waterproof; heatproof; beautiful.
Cons: expensive; porous; stains easily unless professionally sealed; can scratch; may need resealing periodically as per manufacturer.
If you have countertops in unusual shapes, concrete may be a good choice, as they're often cast right in your kitchen. The high price tag may be beyond most people's budget.
Pros: heat and scratch resistant; can be color-tinted; looks exotic and unusual; new treatments eliminate cracking; additives reduce porosity; new finishes are more decorative.
Cons: mid to high range on cost due to custom work; cracking is possible; can look somewhat industrial; porous but can be sealed.

Stainless Steel Countertop

Soapstone Countertop

Part 2 of the last 5 Top 10 Kitchen Countertops will be posted next. See you there!

Tuesday, 19 May 2009

Episode 115 - Stir Fried Elbow Pasta with Chicken & Cabbage

Now that would be the longest name for a recipe haha.. Hi all, I just cooked this half an hour ago and I've never cooked this before but when I tasted it, it was really good! I burnt my tongue though because I was too excited of how the taste would turn out hehe. Anyway, there's a reason why I used Elbow Pasta. Elbow pasta has holes through them and the sauce & meat can get trapped inside thus when you take a bite, you can really taste all the flavours & stuff. You can also use Penne pasta. However, I don't really like Bowtie Pasta because the middle part would be pretty chewy if you don't cook them well. I also chose to use chicken meat because it's less fatty. But beef would also be really good with this recipe.

Stir Fried Elbow Pasta with Chicken & Cabbage

Ingredients:
1/2 packet of San Remo Elbow Pasta
1 cup of minced Chicken meat (around 0.2kg+)
2 cloves of Garlic
1/2 Large Onion
1/4 of Cabbage
3 inches of Carrot
1/2 a jar of Ragulleto Romano Cheese Tomato Sauce
2-3 tablespoon of shredded Parmesan Cheese
2 tablespoon of Cheddar Cream Cheese
1 small tin of Button Mushrooms (ready sliced)
5 tablespoon of Olive Oil
2 tablespoon of Butter
Salt, Pepper and Dried Parsley
1 tablespoon of raw/brown sugar

Method:
Cook the pasta as instructed on the packet (make sure to boil your pasta with some salt in the water, around 2 tablespoon for this). When it's nearly done, you can start cooking the ingredients by using a non-stick wok, place the olive oil and butter and sate the chopped onion and garlic on medium low heat. Put in the minced meat and stir fry it for a bit. Keep in mind to always stir the meat and break it up so that it won't clump together in chunks (you can add abit of water to the meat to loosen it up before you stir fry it). Then, put in your shredded cabbage and shredded carrot and continue to stir fry everything till nearly cooked. Then dump in the sliced mushrooms. Now, you can drain the pasta and put the whole lot into the wok.

Afterthat, you can put in the sauce, shredded cheese, cream cheese and stir eveything up till it's mixed well. If the pasta seems abit dry, you can add abit more sauce. Lastly, season it with salt and pepper,parsley and add the sugar. Stir and give it a taste. Delicious innit? :oD

Serves: 4-5

Dear reader/fan (you know who you are), this page is dedicated especially for you ;0)

Alright guys, I hope you enjoyed this cooking ride with me. I'll see you on the next update!
Mwahs

Sunday, 17 May 2009

Episode 114 - Pancakes, Pancakes

Guess what I had this morning for breakfast? PANCAKES! It's been a while I haven't make pancakes and they tasted rather delicious plus I was super hungry *teehee*. I think pancakes are rather simple to make, they can be eaten with so many things. They can be eaten with Baked Red Beans or scrambled eggs or they can be simply eaten just like that, all depends on what you have put in your pancake mix. They even have those ready made ones in a plastic bottle where you just need to add water, give it a shake and just pour onto a pan to be cooked! Here's how you can make your home-made yummy pancakes. All you need are:

Pancakes

Ingredients:
3 cups of Self- rising flour
1 egg
1/2 cup of Condensed milk
1 cup of Milk
1/2 cup of Water
Butter (Salted) & Corn Oil

Method:
Sift the flour into a bowl. Make a crater in the middle of bowl of sifted flour. Crack in the egg, Condensed milk, milk, water into the crater and whisk it slowly in a circular motion. The batter should be smooth and medium thin. It should not be too watery. If it is still very thick, add a few more tablespoons of milk until it becomes smooth when you lift the batter with a saddle.

Preheat a non-stick pan on low heat and place some cooking oil first then a knob of butter. Take a full spoon of batter with the saddle and pour into the middle of the pan. Once you see air bubbles poppin up on the pancake and the sides are starting to turn golden brown, flip it and let it cook till it turns golden brown.

Serve the pancakes warm with Jam (I recommend Raspberry!!), butter or more Condensed milk. You can also eat them with ice cream and fresh fruits.
To make a Crepe batter, add another half cup of milk to your batter until it turns thin and use a normal flour instead of a Self-Rising one. When pouring onto a non-stick pan, make sure that the batter is spread thinly all over by tilting the pan in a circular motion.

Splendid! So Enjoy! /(0-,0)\

Serves: 3 - 4

Saturday, 16 May 2009

Episode 113 - Tips for Remodelling your Kitchen


RENOVATING THE KITCHEN ?...

.... would be my near future plan. I went online to search on some tips for remodelling a kitchen and these are the basic things that I found very useful:


GREAT TIPS WHEN REMODELLING YOUR KITCHEN

1. Separate your needs from desires. What do you really need and desire in your kitchen. For example, you many need a new kitchen countertop but you may not require a dishwasher which is what you desire.

2. Will the remodelling be worth it? During the remodelling, workers will be around in a certain period of time and it can be messy (the noise, the dust etc). However, think about the long term advantage. Remodelling the kitchen can cause the upsell of the value of the house in the future!

3. What type of renovation do you want? Will a full-scale - changing everything from top to bottom (which can cause thousands and thousands if dollars) reno do it? or just a surface-level (e.g. changing the stoves or fridge, repainting or laminating surfaces only) reno?

4. To reduce the cost of renovation, you may want to think of whether you need to hire a contractor/ pro or doing several things yourself. E.g. buying materials or items which are DIY and be fixed easily without a Pro.

5. Use the Kitchen Planning Rule of Thumb i.e. The Classic Kitchen Triangle. When planning on how the layout of the kitchen should be, this rule allows an easy work flow for the cook/user. There are 3 points in which the cook should be able to move easily from which is from the fridge to the sink and to the stove/oven (illustrated below).

I hope these great tips can allow you to remodel your kitchen better!

More tips on your way, so stay tuned! ;oD

Friday, 15 May 2009

Episode 112 - The Top TEN + 1 Bakeware Essentials


The Bakeware Essentials.

Baking can be tedious for some. But for the rest, it is definitely FUN, FUN and more FUN! There are just a few essentials you need when you bake. Depends on whether it's a cake or a bread, you may want to check if your kitchen has some of the items listed below.

1. A mixer (In the pic is my Dream Mixer *sighs*)

2. Rubber Spatula

3. Measuring Cup
4. Measuring Spoons

5. Weigher/Scale

6. Rolling Pin

7. Sifter (This one shown in the pic is definitely mess free!)

8. Baking Trays (Different Sizes and Shapes)

9. Whisk

10. Grill/Wire Mesh

And never forget your Oven Mits because you wouldn't want to burn those pretty fingers of yours!

Well, Ok, top ELEVEN Bakeware Essentials then Hehe. There's no harm in getting these items in any Supermarket or Bakeware Store ( I recommend Le'Apple, BSB - they have nearly everything!). You can also get the items by IKEA with an affordable price plus they always look rather stylish ! But as long as the item works, you can bake your life away! :0)

Episode 111 - Baked Fish with Oyster and Sesame Sauce

It's that time again! It's eating time! Hehe Hey you all! Today I'm posting a recipe called Baked Fish with Oyster and Sesame Sauce. If you're pretty lazy to fry your fish, you can just marinate your fish like the following and pop it in the oven! Simple!

Baked Fish with Oyster and Sesame Sauce

Ingredients:
A slice of Fish (as seen in the pic)
A few slices of Ginger
Half fresh Chilli
1 clove of Garlic
1 Red Onion (2 if small)
1 tablespoon of Sesame Oil
1 tablespoon of Oyster Sauce
1 teaspoon of Maggi Seasoning Sauce
1 dash of fine Black Pepper

Method:
Chop the Garlic, Chilli, Ginger and red Onion. Mix them all with the wet ingredients and the pepper into a bowl. Put the fish in so that it's covered with the ingredients. Set aside for a few an hour or so.

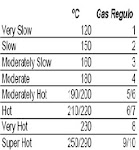
Place the fish (make sure you pour all the sauces and chopped ingredients on top) into an oiled tray. You can cut some carrots and sprinkle on top before you put in into the oven at Gas number 5 for around ten minutes or until the flesh has turned white.

Serve while its hot and with a bowl of steamed rice ;o)

Serves: 2

Wednesday, 13 May 2009

Episode 110 - Kitchen Essentials : Knives

What do you need to cook? The gadgets and a kitchen of course! You have no idea how kitchenware are so important to a cook. Good knives, the right pots and pans, a complete kitchen with a workable stove, an oven and even down right to the interiors and exteriors of a kitchen poses a great deal for people to cook in!

I just got a set of knives last month and they're pratically my best buddies in my kitchen today! It's a set of 5 knives for different purposes. They're so sharp that the other day when my finger accidentally landed on the edge of one of them, I got a cut *ouch* But ya, a good knife can provide lots of advantages, regardless when you're cutting garlic, veges, chop your meat or even cutting a piece of cake. There are so many types of knives for different purposes in the kitchen and these are the few basic knives you need:


1. The "Chef"/Cook's Knife - for general purposes.

2. The Pairing Knife - for small works e.g. peeling fruits.

3. The Slicer /Utility Knife - Usually 1 long and 1 short in a set of Knives for carving meats etc.
4. The Round End Slicer / Bread Knife - for cutting breads, usually has a "teethed" blade.
5. The Cleaver - Very famous in prepairing Chinese Cuisines, usually for heavy cuttings (chopping through bones) & skinning.

(Pictures were taken from http://www.kitchenknives.com/)

My favourites would be the Chef, the Bread and the Cleaver knives as they can work through a lot when prepairing a dish. Other than that, kitchen designers have created unique gadgets for everyday use in the kitchen. It may only be a simple juice extracter or a knife holder but sometimes the colour or the style to it comes a long way! For example, IKEA have lots of home and kitchen appliances which are ever-so convenient and yet stylish for users! I personally love these:

From Top to Bottom : The Timer - an essential device that you need when you need to leave the kitchen. The grater, how great that this was designed with a container attached to it! It's just mess free when you grate that cheese. The Chopper! These smart designers made chopping effortless! And who can miss the Black and Red coloured Chopping Boards? You can "stylisimo" your kitchen with these and many more. So got your nearest IKEA store to get these cool stuffs! (Pictures were taken from http://www.ikea.com/)

More on Kitchen appliances and Kitchenwares in my upcoming blogs!!!!
Thanks for reading!! xoxo

Monday, 11 May 2009

Episode 109 - Five Spice Lamb Shank

Ever heard of five spice powder? It is usually to cook duck - braised or roasted (mmmm...) and many other Chinese dishes. This special powder can enhance your dish in the most amazing ways. It works great with meat. The 5 spice powder usually consists of Chinese Cinnamon (the bark of the Cassia tree - which is a close relative to the Cinammon), powdered Cassia buds, powdered star anise & anise seed, ginger root and ground cloves. And it has a really nice smell. Today, we're using 5 spice to spice-up my lamb shank. I marinated this one night before and I can tell you the spices and the rest of the ingredients just seep right through the meat and you can taste it after you've cooked your lamb shank. If you like your lamb to be sweet with a bit of zesty taste follow these easy few steps and you just need the following:

Five Spice Lamb Shank

Ingredients:
Lamb leg (the lower bit) - around 4 pieces/1 kg
3 Cloves of Garlic
2 teaspoon of salt
1 tablespoon of 5 spice
A handful of Thyme (fresh)/1 1/2 tablespoon of dried thyme
2 teaspoon of Rosemary (If fresh - a few plugs of it)
2 teaspoon of Ground Black Pepper
1 tablespoon of Honey Hickory BBQ sauce/ Honey
3 tablespoon of HP sauce
1 tablespoon of Worcestershire Sauce
2 tablespoon of Tomato Sauce

Method:

Slice the lamb meat (horizontal to the bone) so that the marinate will seep in and it will cook nicely inside. Then, Place the lamb legs in a Zipbag and dump all the ingredients into the bag or you can mix all the ingredients in a bowl and pour the sauce in the bag. The cloves of Garlic are to be smashed and left as a whole or you can chop it up for a more garlic-ey flavour. Massage through, making sure the lamb is covered with all the sauces and the herbs. Refridgerate it for a night or a few hours.

In a baking tray, lay it with aluminium foil (you can do without if you use a deep tray) and add a few tablespoon of Olive oil. Place the lamb legs on the oiled tray (Can add finely cut Large Onion sprinkled on top) and put it in oven at Gas number 6-7 for around 40-45 minutes. Thicker meat will take a longer time. The heat should be medium low at all time in order for it to stay juicy.
Enjoy your lamb shank with salad, rice or potatoes! Slurps!

Serves: 4 - 5

Monday, 4 May 2009

Episode 108 - Baked Potato Wedges

I tell you one thing, these wedges of sweetness are just mindblowing! I made these the other night for dinner. It is so full of goodness that you'd just eat it plain. They go great at parties or as afternoon snacks! They're easy to prepare but it takes a lil' bit more time to cook. Alright, the sweetness starts here:

Baked Potato Wedges

Ingredients:
6 Australian Washed Potatoes
5 tablespoon of Olive Oil
2 teaspoon of (freshly grounded) Pepper (black or white, it does'nt matter)
2 teaspoon of Paprika powder
1 teaspoon of Salt

Method:
Firstly, preheat the oven to gas number 5-6. Then, cut the potatoes in wedges (leave the skin on), first in half then wedge them around 4 each sides. After cutting all the potatoes, marinate them with 2 tablespoon of olive oil, and the rest of the ingredients. Toss the potatoes and set the bowl aside in the fridge for an hour or so. On a large baking tray, laid with aluminium foil, grease it with the leftover Olive oil and lay each piece of wedges on the flat side. Bake the potatoes in the oven for 20-25 minutes. Then switch the oven to top heat on and let the potatoes brown and crisp for a few minutes. Make sure to watch when this is done so you will not burnt the sweet ones.

Sprinkle a little chopped/dried Parsley and serve warm with dips (try them with Chilli Sauce or Sweet and Sour dip) or you can just eat them straight that way. Mmmm, sweeeeettt.

Serves: 6-7


Saturday, 2 May 2009

Episode 107 - NH's Salad


Well, they have Ceaser, we have NH! Hehe This is my very own version of Ceaser Salad. I tried the Ceaser Salad sauce they had in the bottle, I must say I don't quite like it because it was a bit too sour for me. So i tried this just now and it tasted as good! My sis second me, she reassured that it tasted like Ceaser Salad. Ok, when you're eating steak or anything Western at home, make this as it is such a great tasted salad to go with your meal!

NH's Salad

Ingredients:
6-7 leaves of Iceberg Lettuce
1 tablespoon of Olive Oil
2 tablespoon of Mayonaise
1 tablespoon of Cream Cheese
2 tablespoon of fine Parmesan cheese
2 teaspoon of garlic Powder

Method:
Wash and cut the lettuce in the size that you like (usually around 2 inch across would make it easier to toss). Mix all the wet ingredients into a small bowl and put it in the bowl of cut leaves you prepared earlier. Add the Parmesan cheese and toss the salad well.

As you can see in the pic, I added a little colour to it by cutting strips of carrots. The salad also goes real well with (tin canned) tuna, smoked salmon or grilled chicken (you can use leftover chicken meat). Try it! You won't regret it! :0)
Serves: 4-5

Friday, 1 May 2009

Episode 106 - Garrrrrlic Bread

And you thought that that basket of Garlic Bread you order at the cafe is difficult to make? Hehe No, it's really easy! All you need are several items and Voila you can have home-made garlic bread in 20 minutes!

The Very Basic Garlic Bread

Ingredients:
A loaf of French Bread
Butter
Garlic powder/A few cloves of garlic
Dried Parsley

Method:
Cut the bread like those in the bruschette recipe, around half an inch thick, sideways (any way would work actually :). Smear butter on one side (don't be so karit on the butter), covering the whole area and place them on a baking tray. Sprinkle the pieces of buttered bread with lots of garlic powder (around 1 tablespoon each piece) and then the parsley. Or instead of the garli powder, you can crush a a clove of garlic with a pastor and mortar and mix them with butter (must be a bit soft so it's easier to blend them garlic in). A clove of garlic (An inch in a half length) is enough for 2 tablespoon of soft butter). Not too much garlic though, or else it'll just stink up your breath. Who knows, you are going to bake for your bf/gf hehe. Bake them in a preheated oven, top heat on until butter has totally melted or until golden.

Let it cool on a wire mash and chomp it up!

Episode 105 - Fruit Cocktail Cheesecake

Cheesecakes.
Baked or frozen I think that they are one of the most delicous cakes I've ever tasted. I started making this not long ago and realised it was easier than I thought. I'm going to make this tonight and serve them to my relatives coming to visit from Kuching tomorrow! And there's one particular friend out there who loves this! Yes, it's for you too *hehe*. For those who still buys the $3.50 slice of cheesecake at the Bakery, go to the nearest Supermarket, get the ingredients and try to whip this up yourself!


Fruit Cocktail Cheesecake

Ingredients:
2 bars of 250g Phillidelphia Cheese (Containered ones work the same and don't get the light ones)
1 tin (380g) of condensed milk
3 - 4 teaspoons of Gelatine
8 - 10 pcs of Digestive Biscuits (a bigger pan will need more)
1/2 cup butter
1 tin of Fruit Cocktail

Method:
To make the base, crush the digestives in a Zipbag until fine. Melt the butter and mix the crushed biscuits and butter in a bowl. In a 20cm by 20cm (6cm high) springfoam pan/baking tray, put the crushed biscuits and flattened them evenly on the base with a spoon. Make sure the whole base is well covered. Then put it in the freezer while you make the cheese topping.

With a mixer, beat the cheese for around 5 minutes or until light and creamy (an indication of it well beaten is that when you use a baking spatula the cheese glides off nicely). Then add in 1/2 tin of condensed milk or add in a few tablespoons at a time and taste to your sweetness liking. Put your mixer under low and let it beat slowly while you add hot water (5 tablespoons) to the Gelatine. Make sure to stir it well and get rid of the lumps or else it will curd up in your cheesecake. Pour the Gelatine into the mixture and beat well for around half a minute. Pour the cheese mixture into the frozen pan/tray and put it back into the freezer for 1 hour. Then, drain the fruit cocktail well and top your cheesecake with the cocktail and place it back into the freezer for another four hours and switch it to the fridge after.

Serve with more fruits or Chocolate Syrup!

Serves: 8 - 10 (depending on how many slices a person takes :oD )

Btw I had the funniest comment about my blog. A friend of mine told me that it lacked Drama! *haha* Ok, I'll try to put in Drama in a food blog *sarcastic*. Maybe spice up my cheesecake with Chillies. Hmmmmm *inspired*. Alright guys, enjoy. My next few posts will contain more deserts and Chinese dishes. Plus comments on my trip to the Airport Restaurant for the Thai Buffet.

Till the next post, enjoy every bit of your food because in some parts of the world they don't even have enough.